Showing posts with label CAV. Show all posts

20140504

Reapercon '14 Pics

So, I went to ReaperCon 2014 last weekend. HAD A BLAST!

Got to see several people I known, but haven't seen, in years. Got some games in. Got some cool new stuff to play with. Got some info on the next version of CAV. (Hint: Not as bad as I thought, but I still don't like it.)

What I didn't get was a lot of pictures. Here's what I have so far:

Demo material for CAV:SO


A Bonesium CAV to call my own


This was supposed to be the new Emperor, but will now be called something else

A wild west participation game I played in. I was one of the bad guys trying to stop the law dogs from taking our compatriot to the hangin' tree. I shot the Preacher.


The first eight CAVs to be done in Bonesium


New CAV designs. Some I like, others not so much.

Bolt Action participation game. Another gentleman (off screen to the right) and I played the Americans. Some amazingly lucky die rolls in this game. First a Sherman and a bazooka team took out the StuG on our left in the first turn. In turn 3 we got an airstrike. I rolled up a tactical bomber (I think that's what it's called, I rolled a six to determine the aircraft type if anyone cares to assist) which obliterated that Tiger on our right. In retrospect, we shouldn't have put the AT gun where we did.


I've known this fine man through message boards and Facebook for the past 10 years or so, finally got to meet him in person. We had a couple great games of Starmada:AE on Saturday (regular and SFU). Unfortunately we were having such a great time I forgot to take pictures of that. :(

And here's the loot (not including the swag bag). The box has three frames of German infantry, enough for 15 or 18 figures if I remember correctly.


These were acquired the week before the con. Adding about 20 (goblin math) miniatures to my collection.

20121104

Fixing CAV

Evilmonkey and I got together for a 5,000 point game of CAV yesterday to try out some ideas I've been percolating in my noggin for some time now. Particularly Indirect Fire, Jamming, and Target Lock. The Jamming and Target Lock ideas are in the right direction but aren't ready for prime time yet. Indirect Fire I think we have a good solution for.

Currently in CAV2 Indirect Fire is a fairly convoluted process that involves at a minimum two die rolls. The first roll is to determine whether or not the shot hit the target point (which will not happen for most models); if the shot did not hit the target point a second roll is to determine the direction and distance the shot drifts, and finally the third roll is for damage to models in the AoE.

My method combines the the Target Point and Drift rolls. In essence you add all the Target Point roll modifiers to a d10 roll and subtract the result from 10. If the number is positive that's the drift distance in the direction indicated by the die.

example: An undamaged Specter with Target Lock, and no jamming effects rolls 1d10 and gets a 7. Add two for FRS, two for TC, and two for the Target Lock for a result of 13. 10-13 is -3, zero or less, so the attack hits the Target Point. If the roll had had been a 2, the final result would have been 8 (2+2 for FRS+2 for TC+2 for TL). 10-8 would result in 2 inches of drift distance.

 
What we eventually came to the conclusion of was that it was even faster and yielded about the same results was to calculate the modifiers and roll equal to or less than the result of the calculated modifier and if the roll was higher the difference was the drift distance.

Using the same Specter with a Target Lock and no jamming, the final modifier is 6. If the d10 roll is a 6 or less then the attack hit it's target. If the roll was higher than 6 (we'll say 8 for the sake of an example) then the die roll minus the total modifier becomes the drift distance (8-6=2 inches of drift).

End result is this:
  1. Calculate target number
    1. Add TC of firing model, FRS/# value, and Target Lock bonus
    2. Subtract 2 for each range band beyond the first
    3. Subtract Jamming penalty
  2.  roll 1d10
    1. If result is equal to or less than the target number calculated in Step 1, the attack hits the Target Point
    2. If the result is greater than the target number calculated in Step 1, the drift distance is equal to the die roll minus the target number in the direction indicated by the tip of the d10
Damage is rolled using the RAV and appropriate SAs against the DV of models in the AoE.

The effects of the CFP and Salvo Barrage fire are unchanged.

So, to test these ideas I set up a force using the Children of the Storm doctrine:

Armor Section
3x Dictator 70
1x Kahn 74

Armor Section 2
2x Tyrant
2x Vanquisher

Specialist Section
3x Conqueror

Mortar Section
3x Armored Heavy Mortar Team

Recon Section
4x Warden
2x Jackal

Strikes
1x Artillery Strike

Evilmonkey set up a force of Terrans using the Artillery Support Doctrine:

Armor Section
Thunderhawk
2x Starhawk VI
Starhawk V

Armor Section
2x Naginata
2x Wolf

Specialist Section
3x Rifle Team (one with MG-42 upgrade)

Mech Inf Section
2x Merlin
4x Rifle Team w/ AT-23 upgrade

Fire Support Section
Regent
2x Raptor
1x Talon

Strikes
5x Artillery Barrages

If I weren't testing the new ideas I would've swapped either the specialist or the mortars for probably an armor section with tanks (Despots and Malefactors).

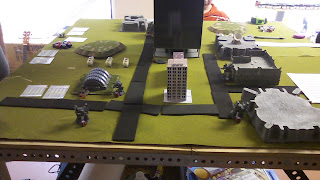
The table was set up with an urban area across the center and canted at roughly 40 degrees from the table edges so that there was no LOS across the table from the starting areas. The only places with LOS all the way across the table were the main street and the river. One thing that we had forgotten up until this game was that recon models get a free move. This is mostly because recon sections don't really have much purpose to exist, as the deployment deck manipulation isn't really enough to justify the cost in points of a full recon section. Couple that with that the only  other reason to take a recon model is to form the nucleus of the Huddle, and you don't want your nucleus out ahead of the rest of the Huddle. The crux of the changes for jamming and target lock were that the recon model had to be close to the enemy models (similar to the 1.5 beta rules) and that TL could be granted to any friendly section, so I was using a full recon section to test the theories. The first turn involved some skirmishing between recon elements, the lobbing of strikes, and positioning of elements. There was a couple exchanges of IA that resulted in a well damaged Talon. The Second turn saw the Charge of the Dictators which with the combined effects of Run'N'Gun, Target Lock, Children of the Storm, and Overdrive saw the one-activation killing of the Thunderhawk. Shortly thereafter in the same turn we saw the Terrans reinforce their flank with the mechanized infantry, which obliterated two of the Dictator 70's in a single activation. The third turn resulted in the loss of my second armor section, his loss of the Starhawk VI. We played a fourth turn which saw the elimination of the remainder of my recon section save one Warden, the loss of a mortar team as well as the reduction to one of my specialist section, the loss of one of his Starhawk VI's, and the loss of his Mech Inf section. We came to the conclusion that with only a Dictator 70, a Conqueror, a Warden, and two Armored Heavy Mortar teams that I didn't have the staying power to contest two Naginatas, a Wolf, a Starhawk VI, a Regent, and a Raptor (all undamaged).

As I said before, we're happy with the results for the IA changes. I know some people would prefer to institute opposed rolls for the jamming and target lock, but I'm aiming for streamlined play to get through IA more quickly without making it overpowering. In this game all the IA was done by Fire Support models, so most of the shots didn't drift. Next time I'll be trying to take some pot shots with Attack models that have an IA weapon.

Here are some pictures

The Terran reinforcement of their right flank after the Thunderhawk was "violated" by the Charge of the Dictators

The crumpling of the Rach right flank to four tanks and two Starhawk VIs

General Table Layout

20120726

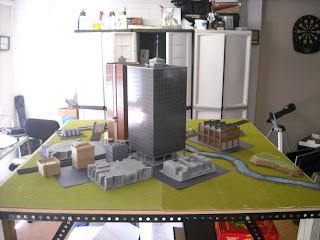
CAVscraper Part 2

Put together the second high rise tower I bought for CAV. This is another Atlas n-scale model kit. Please forgive the somewhat over exposed photo. A Dictator 60, Wolverine, and a stand of infantry are included for scale as well as the first tower I put together.

Started working on the Krakens and am about 70% done with them.


20120613

Black Lightning Dictator

I finished this last weekend, just didn't feel like messing with editing the pictures. A little background on this first, Black Lightning was Reaper's volunteer demo organization and for a while they used to give these unavailable-to-the-public arms for putting on a Dictator 60. My understanding is that the fluff was that they were prototypes of the gauss cannons used on the Dictator 70. I was never a member of the Black Lightning program, though I had bounced the idea around in my head a few times.

A couple years ago a friend of my sent them to me with the promise that I use them. I almost immediately assembled the model, but then I deployed, then moved, and have just now gotten around to painting it.

I'm not entirely sure that I'm happy with the painting on this. My CAV painting ability has apparently decreased somewhat as it has been a couple years since I've painted one as I've been focusing on my startships and 15mm. Well, as much as you can call my frequency of painting "focused." This turned out only partially what I was seeing in my minds eye. I'm thinking that once I get back to my former skill I may strip this one and start over.


20120604

Weekend Miscellany

Been kind of all over the place this weekend with regards to hobby activities.  Saturday morning was spent drafting a supplement for FUBAR to expand upon some ideas. I added different movement modes for vehicles, added rules for handling really large vehicles (think upon the lines of OGREs, 40k super heavy tanks, etc) to use with my Khurasan Siler and Dictator, effects for different types of weapons, and unit abilities. I've posted it at the Forge of War forum, but have yet to receive some feedback on it.

Today I tried this supplement out with the boys and the biggest thing I've determined from it is that I need to get more of my 15mm models finished. The selection I have ready for gaming leaves one side rather over powered compared to the others. So in light of this I spent a good part of this evening painting my ADB Federation Battlecruiser, priming the Federation Dreadnought (I think I died a little priming the glow-in-the-dark plastic, glow-in-the-dark stuff is cool), base coated my Black Lightning Dictator, and prepping a Rach Kraken. All of which have absolutely nothing to do with 15mm.

That's OK though, I've got plenty of unpainted and half-painted figures to ensure that I'll have plenty of time to get through the 15mm stuff eventually. I've been wanting to get all of those models done for some time now. The Feds will get used in the Klingon Armada games with the boys and since I'm actually playing CAV2 again those models will get used, so I don't feel guilty at all. Well except for the amount of time it's taken me to start painting that Black Lightning Dictator. A friend of mine sent them to me a few years ago with the intention that I use them. It's taken a while, but I've started. The Kraken (and eventually its stablemate) were started in a desire to use them. They're stupid fast infantry transports that match well with my Rach infantry tactics outlined a few posts ago. Unfortunately the model has some major gaps in it which required the liberal application of green stuff. It's been a while since I've mentioned this, but I can't stand working with green stuff. We just don't get along.

Painting the Dictator and starships also marks the inaugural use of new airbrush. I can tell it's been a long time since I've used one, I kept mixing the paint too thin. The fact that the humidity spiked while I was airbrushing didn't help matters. I'm going to have to go over all of them again later this week for an even base coat. I'm hoping that by next weekend I'll be able to get at least the Dictator done, if not the two ships. Ideally I'd like to get the second Kraken prepped for priming. I don't think either one will be ready by next weekend if I'm working on the other models. The gap filling took an inordinate amount of time. That and I think they're going to have to be painted in parts then assembled in order to save my sanity due to some hard to reach recesses in the assembled model. That and I'm not entirely sure how I want to paint them yet.

20120529

Memorial Day CAV Marathon

This weekend was pretty productive hobby wise. I finished up some painting that had been sitting around for a while (see previous post) then managed to play three games of CAV2 on top of that.

Saturday was a 3000 point game with the kids.  I was shamelessly using this as an opportunity to test out a couple of list for a game with Paul. I wanted to show that infantry in CAV are not like infantry in Battletech so using CAV Command Console I whipped up a force using one of my favorite tactic, the Rach all infantry force using the No Mercy faction doctrine. I like to call it my Rach Raiders list. In CAV2, using the 2008 errata, each model in base contact with an enemy model gets to attack with a +1 bonus for each supporting model in contact with the target. Each successful attack does one point of damage to the target. The Rach faction doctrine No Mercy gives Rach infantry the ability to do another point of damage on a successful hit. Then add on top of that Satchel Charges, purchased from the overall point total for the force, which when their use is declared before a close combat attack is resolved by infantry cause an additional point of damage on a successful CC attack. So for a successful attack, provided I have satchel charges left, a Rach infantry team can deal three points of damage. In CAV, infantry are the close combat kings. Light infantry get a +5 on a d10 roll vs the targets armor, and armored infantry get a +6. Couple this with the infantry swarming the target for support bonuses and you have a fairly good chance of taking down most CAVs. Most CAVs only get a +1 though some will have an ability that granted a higher bonus vs. infantry.

There's two problems with this though, the first is that infantry are horribly slow on their own. The second is that against models with a higher defensive value (DV) you still have to roll fairly high on an individual attack. The way I get around the first is by using fast transports (Krakens are excellent for this if you have them...I really need to assemble mine), the orbital insertion unit upgrade, and the jet pack training upgrade. With units on transports I recommend that you upgrade your infantry with the Shock Infantry and Jet Pack Training options. Shock makes mounting/dismounting a free action (though you can still only do one or the other each turn) and the jet pack training allows you to use the action you freed up by taking Shock Infantry to close any remaining distance the transport couldn't cover or just allow you to be lazy and not have to measure just close enough with the transport to allow the infantry to dismount into base to base contact. Orbital Insertion allows you to drop your infantry on the turn of your choosing Starship Troopers style onto the tabletop no closer than 12 inches from any opponent model. That 12 inch restriction means that you almost have to give them the jet pack upgrade as well, otherwise after their first turn on the table the battle will move away from them  and you just spent a lot of points on infantry that aren't doing you any good. The jet pack upgrade still leaves them fairly slow, but if you have another section that can fix the target the drop infantry can get back into the mix...eventually.

The second problem is dealt with by swarming the big nasty CAV (tip, don't assault tanks or recon units...it doesn't end well), upgrading one drop section with AT-23 missile launchers (think Javelin or TOW) and another with the FiST upgrade and a selection of strikes. For strikes I like the Orbital Pinpoint Strike and Orbital Strike because they don't drift. But for the big boys with DVs in the 13s and 14s you'll either cruise missiles or Artillery Bombardment. The pinpoint strike is great for taking out that pesky recon CAV that keeps the continual ECM bubble around the attack CAV huddle. The key with the strikes is to "crack the shell" as I like to call getting that important first hit on a model in CAV. Vehicle models in CAV can repair in game, but can never repair to an undamaged state. That first hit is usually accompanied by a drop in DV and sometimes other stats. So for the infantry assault to be more effective, you want to crack the shell a little bit. And if the strike is lucky enough to score a critical hit, even better.

To tie all this together, at 3000 points I put this together as three armored shock infantry with jet packs and satchel charges in three Badger transports. They aren't the fastest, but I don't have my Krakens assembled and painted yet (can we say Shiny Object Syndrome). A second section of drop infantry with FiST and a mix of orbital strikes and orbital pinpoint strikes. And finally a third section of drop infantry upgraded with jet packs and AT-23s. The general plan is on the first turn move the transports up, but don't commit to a target unless your card comes up later in the turn. On the second turn drop the FiSTers and unleash the strikes to get those precious first hits, then commit the transported infantry to an assault. In the third turn, place the drop heavy weapon section to pick off models that weren't engaged by the shock troops, preferably ones damaged by the strikes, rain down more fire from on high, and if the shock troops target is dead move them on to the next one using the transports if necessary. Try to focus on one or two models at a time, otherwise your firepower becomes diluted and you have a bunch of enemy models still on the table that will most likely spend one action repairing then dealing with your infantry. That and there's a certain morale effect on both sides when your infantry can score a quick kill or two on an opposing CAV, especially if it's a super-heavy attack CAV.

The other force I set up because I was somewhat expecting Paul to bring some Terrans and their love for air support. So I set up a patrol force consisting of two armor sections (Wight, Wraith, Ghost, Specter II for the first and two Hunter tanks and two Lance tanks for the other) and a specialist section with two Nomads and a few Artillery Bombardment strikes. In the game with the kids I found that this force is murder on soft targets, especially if the only soft targets are infantry. Here's the pics from the game with the kids:


Initial deployment, the Badgers are off screen to the left behind the power generator

End of turn two, the assault infantry have dealt some damage to the Wight, but weren't able to take it down outright. Notice the red infantry scattered around the table, those are the FiST teams which dealt a fair amount of damage around the Malvie force...except the tanks. The shock infantry withdrew to the woods because they knew the tanks were about to light them up. They had enough movement to re-engage the Wight next turn if need be. The white strips marks the area of effect for artillery delivered smoke for concealment.


Turn 3, enter the drop weapons teams across the other side of the table. They did a good job wiping out several CAVs.


Here's where things turned ugly, most of the CAVs were gone, but I couldn't score a hit against the tanks and they mauled the infantry with their two machine guns each.


CAVs are gone, but three of the tanks remain...

This is where I called it. I didn't have enough of the weapons teams to make a dent in the tank and its machine guns would have shredded my infantry.


So then on Monday Paul came over with tales of ReaperCon. We set up an urban-ish table and against what I had expected he pulled out a Templar force. He organized them as three armor sections using the Bonds of Knighthood doctrine:

Section 1
Centurion
Warlord
Knight

Section 2
Warhawk
2x Gladiator II

Section 3
2x Spartan
Lance

I tweaked my all infantry force and organized them as:

Mech Infantry
3x Badger
6x Rifle Team w/ shock, jet pack training, and six satchel charges

Drop Infantry FiST
3x Armored Rifle Team w/ orbital insertion, FiST, jet pack trainig, and three satchel charges

Drop Infantry Heavy Weapons
6x Rifle Team w/ oribital insertion, AT-23 for each, jet pack training

Here's the pics:

Deployment

Turn 2 Saw the Knight and a Spartan go down and a fair amount of damage to the Centurion. I also lost a Badger before the troops could dismount.

The Warhawk started a dash to support the other side of the table, FiST team put a few points of damage round

Turn 3: Centurion buys it and I do a real mean thing and move my infantry into base contact with the Warlord so that if he tries to move the infantry in contact get a free attack.

Also turn 3: one of my Armored Drop FiSTer teams buy the farm, but not before it and the newly arrived weapons teams take out the other Spartan, a Gladiator II, and put a point of damage on the Lance. (The Lance is really what I was worried about, I remembered how bad they tore up my infantry in the game with the kids.)

Turn 4, Paul cedes the game, I had taken out the Lance and remaining Gladiator II leaving him without much to target infantry with and my troops were fairly well off damage wise.


Since that game went fairly quickly we played on the same table but with fielding the Malvie force for the Rach. It was much longer drawn out game that hung in the balance for quite some time, but in the end fairly consistent above average dice luck on my part and bad dice luck on his lead to another win for me. This game was a much closer affair and I think was better for it. I broke down to the armor units playing hide and seek amongst the buildings. Paul had some good repair rolls, but just couldn't land enough hits to take out my CAVs. We didn't take pictures of this game because we just wanted to focus on playing.

That's it for this past weekend's activity, didn't intend to do the Wall of Text at the beginning but hopefully some of the new players finding CAV for the first time will find it useful.

20120401

A Challenger Appears!

Whilst on the Reaper message boards a few months ago I came across a person who was in my town and was interested in playing CAV. Well, as indicated by the severe lack of activity on this blog RL has been kicking me in the teeth, but yesterday we finally got together and threw some dice and pushed some pewter. No pics for a couple reasons, first I didn't want to keep stopping to take pictures as the kids were interrupting enough on their own, second my camera seems to be on the fritz again.

He had never played it before, but had played Warlord 2e so was familiar with the basic RAGE concepts. Providing models was no problem on my part so I set up a couple forces with him playing Terrans and myself as the Ritterlich. I would normally have played a Rach force, and almost did, but wanted to keep the game simple to get the basics down so didn't include IA, strikes, or recon models with EST or ECM. Also didn't use the faction abilities in order to keep things simple. He played with 2x Starhawk VIs, a Starhawk V, and a Falcon in one section and 2x Wolf tanks in a specialist section. I had 2x Tigers, a Jaguar, and Gladiator II in one section and 2x Wolverine tanks in a specialist section. Table layout was my 4x4 table with a large hill in the center, a smaller hill in each quadrant of the table and a collection of crystal outcroppings I've had sitting around for a while scattered around the center of the table which we counted as rough ground.

I set up my CAVs in the center of the deployment area and my tanks to my right flank. He set up for a pincer with a 'Hawk VI, Falcon, and a Wolf on his left and a 'Hawk VI, 'Hawk V, and Wolf on his right. From the word go I knew it was going to be ugly for me, he killed the Jaguar on his first activation with an amazing critical hit. Throughout the game the Tigers barely got out of their deployment area because I kept attempting (and failing) repair rolls. The Tigers eventually managed to kill the 'Hawk VI on his right the Wolverines the one on his left, but by then they were all I had left. I'm starting to think my d10's are cursed and I need to melt them down and buy replacements. Either that or switch to a d6-based game. My dice were definitely cold, and his were hot. He rolled a lot of crits. I don't normally blame my dice, but I couldn't enact any kind of plan because when I would try anything, the rolls would fail. Still had an enjoyable game though and had fun talking miniatures with somebody. He enjoyed the game and I'm sure we'll get together for more Big Stompy Robot goodness. He does commission paining on the side so I'm looking forward to seeing his models.

20111106

CAV Game from a Couple Weeks Ago

A couple weeks ago Aprile expressed an interest playing a game of CAV. So I threw some stuff on the table, figured up a couple forces, and came up with a scenario. During the Terran invastion of Vega, they dispacted a flanking force to draw Rach defenders in the city of Kreogh's Landing. The Terrans sent of a force consisting of a Thunderbird, Ronin, Starhawk VI, and a Puma. In an effort to blunt their advance, the Rach cobbled together a force with an Emperor, two Despots, and a full section of AT-23 armed light infantry.  The Rach planned to stay within the edge of the city moving from cover to fire then return to cover with the infantry taking up positions in the woods to fire at the incoming CAVs with their missile launchers.  This was working well, until Aprile realized that the Emperor has something of a glass jaw. She ended up winning and the Terrans proceeded to harass the flanks of the Rach defenders deeper in the city.


20110815

CAV2 With the Kids

Set up a game of CAV2 to play with SWMBO on Saturday night to play Sunday afternoon. She decided to bake cookies instead (like I'm going to argue with homemade chocolate chip cookies) so I asked the boys to play. They were all rather excited.

The simplistic scenario was that a Ritterlich strike group had orders to plant demolition charges on a Terran helipad and a communications building as part of a larger operation. This was accomplished by spending two total actions by an infantry team. The trick was that the helipad and commo building were in a guarded outpost. The outpost was guarded by an armor section, a mechanized infantry section, a flight of Kikyus, and six stationary turrets. The Ritterlich force consisted of an armor section, a mechanized infantry section, and a specialist section. It worked out to just shy of 3000 points per side, though I did not count the turrets against the turrets so they had a bit of an advantage point wise.

Ritterlich strike group

Armor
2x Tiger
1x Jaguar
1x Puma

Mechanized Infantry
2x Hedgehog
6x Rifle Infantry

Specialist
2x Wolverine
2x Conqueror

Terran defenders

Armor
1x Ronin
2x Starhawk VI
1x Regent

Mechanized Infantry
2x Centipede
4x Rifle Infantry w/ AT-23 upgrade

Flight
2x Kikyu

Turrets
6x Odin turrets

Don't ask about the legality of the structures, I didn't pay real close attention to how many points were faction specific models. We're weren't using faction abilities anyway just to keep things simple.

Here's the initial set up:


As you can see, the raiders had a fair amount of open ground to cross. I really wish I had some fencing to use for such a scenario. I'll have to add that to the "one of these days" project list. The Ritterlich faction ability that grants Assault to all it's models would've been helpful, maybe next time.

My assistant die roller cheering from the sidelines (age 5) and assistant model mover (age 7)


I took the Ritterlich force while my two older boys Michael and Zachary spit the Terrans. Zachary ran the turrets and Michael the CAVs and infantry. On the first turn the raiders advanced and took some heavy fire from the turrets. Michael moved a few CAVs to clearer lines of fire, but took some damage to a Starhawk for the trouble.


I was using the Wolverines to hold my right flank and the CAVs to draw attention away from the Hedgehogs as they made their run to the buildings. It almost worked except that Zachary kept an eagle eye on those transports. Second turn saw the further advance of my CAVs and the heavy damaging of one Tiger, the Wolverines taking position across the river to engage turrets, one Hedgehog unloading its infantry into contact with the helipad and placing one action on it while engaging the enemy infantry. No heavy casualties as of yet, but not for lack of trying. One Tiger and one Starhawk VI were very close to biting it.


Third turn saw the destruction of the helipad, the Tiger and Starhawk going down and the Ronin moving forward and starting to lay into a Wolverine. The second transport unloaded infantry into base to base contact with the Regent and combined with covering fire from the Hedgehog inflicted four points of damage. Unfortunately my photographer and assistant model mover got bored by this point and ran off with the camera taking pictures of everything but the game.

The fourth turn was it as the first infantry team engaged the comms building and achieving the scenario goal. I didn't throw the game, though I'd occasionally ask if they really wanted to do something, then explain potential outcomes and why. Granted I wasn't playing cut throat, but I didn't do anything I wouldn't do against another opponent. Sometimes Michael and Zachary would inadvertently work against each other, like in the second turn, Michael parked a Starhawk right in front of a turret, blocking LOS. Played the rules mostly by ear as I still remember most of them, but I do admit to making a mistake in my favor, I misread the turrets' data card and thought they only had one ranged attack rather than two. Though I will say that if the scenario called for the exit of the raiders by the same edge they entered, the game most likely would've gone to the boys. If I run this one again, first, the turrets will get their full attacks, faction doctrines will be in play (though I'll probably have to remind the boys about them), probably swap the Ronin for tanks, and up the number of actions required to "destroy" a building.

Even with all the hullaballoo about CAV:SO, it was nice to get the BSRs out and smash things with the rules I like so much. I think I'm going to have to sit down one of these days and work out the house rules I want to use borrowing from Mil-Net's discussions along those lines. They boys had fun, though Zachary said he preferred the starship game (Starmada).